We painted, cleaned, organized, packed and sold our home.
We painted, cleaned, organized, packed and unpacked our sons home.
We "sort of" unpacked some of our things and lived in two rooms on the second floor of a rented Victorian perched and precariously leaning over a cliff while we looked for a new house in our new city. The landlord kindly allowed pets and wasn't a convicted child pornographer (but that's another story...)
We found a house and fought tooth and nail with HUD over it for over two months and had our settlement delayed six times.
We went a little crazy with a sawsall and became "squatters" in a HUD house for 11 fretful days before it was legally ours.
Then the real fun started - plumbers, electricians and roofers, oh my! Everyone it seemed needed a check for $7000.00. Apparently that's the going rate in Pittsburgh for whatever it is you need done. Or it's just a really strange coincidence. Was there a secret meeting somewhere where it was decided that $7000.00 was the magic number for us?
From June through early December we worked from sun up to sun down and sometimes well past. We laughed, we cried (okay I cried once), we drained our bank account, proclaimed both our love and hatred of Pittsburgh and had a very public fight in the local Target over a shower curtain.
It's been a hell of a year and I can't say I'm sorry to see it pass. But, I'm thankful too - thankful for the contractors who really did each do a fabulous job - especially our electrician who became like part of the family. I'm thankful for our new friends and neighbors who couldn't be more nice or supportive. I'm thankful to have the kind of home that used to only be a dream, and most of all I'm thankful to Drew for having the patience of a saint. He doesn't particularly enjoy any of this mayhem that he's spent the last year totally immersed in. He's not a DIY'er, doesn't like disruption in his routines, and would like nothing more than to relax with a beer and watch a football or basketball game after work. I wish him more of that in the new year.
And no more packing and unpacking!
Happy New Year Everyone!
Monday, December 31, 2007
Sunday, December 30, 2007
The word of the day is: SAD - but, I'm happy!
Our last house was only two years old when we bought it. I think we had a pry bar and sledgehammer in the trunk when we went to the settlement table. Our very first act after getting the keys was to completely gut the kitchen. Next came the powder room and at one point there was a toilet next to the fridge in the living room.
This memory is one of the reasons that my husband promised to never try to talk me into buying a new house again. It doesn't matter to me that the electrical is up to code, the drains drain or that the heater heats - I've got tools and I gotta be me.
Once the new kitchen was finished it was, in our estimation, pretty fabulous except... something.... Something was missing. You know that "not quite right" feeling in a room. It was shiny and new and we finally realized what it was missing - something OLD. Something to juxtapose all that "perfection", our "ying" needed some "yang"!
I can't remember how we arrived at the decision to remedy this situation by adding a chrome and formica table with vinyl chairs into the mix, but we did. We started scouring ebay and local auctions looking for a red "cracked ice" table. You know the routine I'm sure - "this one's too big", "this one's too small" etc and then one day I saw them - across the room - they called to me. Four simple black wooden chairs that looked like something my grandfather would have put together in the basement with a copy of Popular Mechanics at his side.
At first glance hubby poo-pooed them. They weren't what we were looking for. I pouted. I made him sit on them. I gave him "the eyes". I promised things we both knew I'd never deliver on - but, it didn't matter - cause we got the chairs!
While loading them up I noticed a paper label under the seat of one of the chairs. H. T. Cushman Mfg Co. That sounded vaguely familiar... I googled the company up and found quite an interesting history such as Henry T. Cushman was the man who came up with the idea to attach an eraser to the end of a pencil. You can read about H.T. Cushman here if you'd like.
Well, the chairs were perfect for the kitchen and just the touch it needed. Hubby was in complete agreement on this and we completely reversed gears on the red cracked ice table and found a nice old enamel top table with chrome legs that didn't match the chairs but certainly complimented them.
Time went on, and last year we sold our house and moved to Pittsburgh. I remember telling the mover that the kitchen chairs were "my most prized possession". I don't know if that's true but it seemed the thing to say at the time as he was gingerly swinging one around in each hand.
From time to time I try to find out more info about the chairs but always come up empty. I've never seen another set like them. I think they're from a 1920's bridge set (each of the chairs has a playing card suit cutout in the back splat). They're simply constructed in an arts and crafts fashion with the little pyramid shape on the top of the backrests and held together with bolts.
Last night I emailed a gentleman whose name I found on a Vermont website who was listed as an authority on Cushman furniture, and included a poor quality photo showing two of the chairs that are currently in our entryway. Yeah, I still call them my kitchen chairs - but, this house's kitchen is a lot smaller and being that the chairs and house are from the same era they seem to be at home wherever I place them.

I didn't expect to get a response over the weekend, but Mr. Gertz replied very promptly this morning and seemed cautiously excited. So now I am too! Of course he requested more and better photos and since today was a workday for me I'm grateful that hubby picked up my slack and hauled the chairs out into the daylight to take some decent photos with our cheap digital camera.
He was also kind enough to upload the pics and send them to Mr. Gertz but in the text of the message he mentioned something about being "saddened...to see the black paint drips remaining from whatever idiot painted over the original finish."
I never knew that he was "saddened" about our chairs being painted black some decades ago. I LIKE the paint, and the worn spots, and the tiny paint spatters where someone used a roller nearby but no tarp. Maybe in the end it will detract from their monetary value... but, "saddened"? They're pretty damned cool - we got them for a song - and I think their mystery is about to be revealed. I'm psyched!
I called my son's longtime ex-girlfriend over lunch to tell her the news - our chairs are "rare" and may be "fairly valuable"! The girl is like a daughter I never had and I knew this would be right up her alley. We could talk design and renovation all day! Our conversation turned to auctions, antiques, and finally to Ikea. It seems there's no Ikea near their home and she's been trying to talk her current boyfriend into taking a day trip to one. He's unfamiliar with Ikea and apparently not too keen on the idea - asking her "isn't it just a furniture store?".
She told me that she assured him that she too was sad when she first learned she was being taken to a furniture store! I laughed my ass off at that! It was me that drug her off to the Gulph Mills Ikea Grand Opening! She was a teenager at the time and never even occurred to me that driving an hour to spend a Saturday at a furniture store wasn't her idea of fun! LOL We did have a blast though, bless her little heart. And I know she reads this blog so I want her to know she made my day.
So, today I learned (or re-learned) two things:
Beauty is in the eye of the beholder and that I am insensitive and blissfully unaware of the feelings of those I love.
UPDATE: Mr. Gertz replied this morning and says that he's never seen Cushman bridge chairs from the arts and crafts era and that they are "very rare indeed"! :o) He was kind enough to include photos of a later Cushman's "Colonial Collection" bridge set that aside from the cut-out back splats are worlds away from the style of our chairs. Mr. Gertz can date our chairs to between 1915 and 1930. For reasons I cannot even articulate I feel fairly confident that they were made in the 1920's. Take that for what it's worth... Oh, and speaking of worth - he feels that a collector might value the set in range of $400 to $600. Not bad for an $80 investment that I don't plan to ever part with anyway.
How lucky were we to be in just the right place at just the right time that this set went to auction?

This memory is one of the reasons that my husband promised to never try to talk me into buying a new house again. It doesn't matter to me that the electrical is up to code, the drains drain or that the heater heats - I've got tools and I gotta be me.
Once the new kitchen was finished it was, in our estimation, pretty fabulous except... something.... Something was missing. You know that "not quite right" feeling in a room. It was shiny and new and we finally realized what it was missing - something OLD. Something to juxtapose all that "perfection", our "ying" needed some "yang"!
I can't remember how we arrived at the decision to remedy this situation by adding a chrome and formica table with vinyl chairs into the mix, but we did. We started scouring ebay and local auctions looking for a red "cracked ice" table. You know the routine I'm sure - "this one's too big", "this one's too small" etc and then one day I saw them - across the room - they called to me. Four simple black wooden chairs that looked like something my grandfather would have put together in the basement with a copy of Popular Mechanics at his side.
At first glance hubby poo-pooed them. They weren't what we were looking for. I pouted. I made him sit on them. I gave him "the eyes". I promised things we both knew I'd never deliver on - but, it didn't matter - cause we got the chairs!
While loading them up I noticed a paper label under the seat of one of the chairs. H. T. Cushman Mfg Co. That sounded vaguely familiar... I googled the company up and found quite an interesting history such as Henry T. Cushman was the man who came up with the idea to attach an eraser to the end of a pencil. You can read about H.T. Cushman here if you'd like.
Well, the chairs were perfect for the kitchen and just the touch it needed. Hubby was in complete agreement on this and we completely reversed gears on the red cracked ice table and found a nice old enamel top table with chrome legs that didn't match the chairs but certainly complimented them.
Time went on, and last year we sold our house and moved to Pittsburgh. I remember telling the mover that the kitchen chairs were "my most prized possession". I don't know if that's true but it seemed the thing to say at the time as he was gingerly swinging one around in each hand.
From time to time I try to find out more info about the chairs but always come up empty. I've never seen another set like them. I think they're from a 1920's bridge set (each of the chairs has a playing card suit cutout in the back splat). They're simply constructed in an arts and crafts fashion with the little pyramid shape on the top of the backrests and held together with bolts.
Last night I emailed a gentleman whose name I found on a Vermont website who was listed as an authority on Cushman furniture, and included a poor quality photo showing two of the chairs that are currently in our entryway. Yeah, I still call them my kitchen chairs - but, this house's kitchen is a lot smaller and being that the chairs and house are from the same era they seem to be at home wherever I place them.
I didn't expect to get a response over the weekend, but Mr. Gertz replied very promptly this morning and seemed cautiously excited. So now I am too! Of course he requested more and better photos and since today was a workday for me I'm grateful that hubby picked up my slack and hauled the chairs out into the daylight to take some decent photos with our cheap digital camera.
He was also kind enough to upload the pics and send them to Mr. Gertz but in the text of the message he mentioned something about being "saddened...to see the black paint drips remaining from whatever idiot painted over the original finish."
I never knew that he was "saddened" about our chairs being painted black some decades ago. I LIKE the paint, and the worn spots, and the tiny paint spatters where someone used a roller nearby but no tarp. Maybe in the end it will detract from their monetary value... but, "saddened"? They're pretty damned cool - we got them for a song - and I think their mystery is about to be revealed. I'm psyched!
I called my son's longtime ex-girlfriend over lunch to tell her the news - our chairs are "rare" and may be "fairly valuable"! The girl is like a daughter I never had and I knew this would be right up her alley. We could talk design and renovation all day! Our conversation turned to auctions, antiques, and finally to Ikea. It seems there's no Ikea near their home and she's been trying to talk her current boyfriend into taking a day trip to one. He's unfamiliar with Ikea and apparently not too keen on the idea - asking her "isn't it just a furniture store?".
She told me that she assured him that she too was sad when she first learned she was being taken to a furniture store! I laughed my ass off at that! It was me that drug her off to the Gulph Mills Ikea Grand Opening! She was a teenager at the time and never even occurred to me that driving an hour to spend a Saturday at a furniture store wasn't her idea of fun! LOL We did have a blast though, bless her little heart. And I know she reads this blog so I want her to know she made my day.
So, today I learned (or re-learned) two things:
Beauty is in the eye of the beholder and that I am insensitive and blissfully unaware of the feelings of those I love.
UPDATE: Mr. Gertz replied this morning and says that he's never seen Cushman bridge chairs from the arts and crafts era and that they are "very rare indeed"! :o) He was kind enough to include photos of a later Cushman's "Colonial Collection" bridge set that aside from the cut-out back splats are worlds away from the style of our chairs. Mr. Gertz can date our chairs to between 1915 and 1930. For reasons I cannot even articulate I feel fairly confident that they were made in the 1920's. Take that for what it's worth... Oh, and speaking of worth - he feels that a collector might value the set in range of $400 to $600. Not bad for an $80 investment that I don't plan to ever part with anyway.
How lucky were we to be in just the right place at just the right time that this set went to auction?
Friday, December 28, 2007
All Will Be Revealed!
Final update on the the peroxide/tile treatment:
I promise this will be the last post about this subject this year (snicker...).
The peroxide treatments didn't make the tiles "look like new". In fact cleaning all the dark crazed spiderweb looking areas revealed every other little flaw they had. There are some minor edge chips that became more apparent after grouting, a few shallow chips here and there right in the faces of the tiles. There are a few hairline cracks...
After buying a heat gun and coaxing out a crazy amount of old caulk between the tiles and the tub I found that the tiles were pretty roughly cut along their bottoms to make way for the tub.
Our house was built in 1920 and our toilet (a Standard Purimo) is dated 1929. I suspect this tub was added as part of that early remodel. I wonder now if we really should have had a clawfoot tub? Oh well... If wishes were horses beggars would ride...
I still can't get the old pitted fixtures off and I hate to call a plumber for such a small job, but it may come to that.
Overall, I'm very happy with the results. I won't be embarrassed or have to explain that the bathroom isn't really dirty anymore.
So, in closing - here's the breakdown: 30% peroxide cream from a beauty supply store - really cheap. I paid about $15 for a gallon of it. It's wicked stuff and not at all like the 3% peroxide you buy in a brown bottle at the drugstore. If you decide to do this invest in a couple pairs of disposable gloves. It'll turn your skin whiter than my tiles - and a lot quicker! Ventilation is really a must.
Heat is the key - you'll definitely need a heat lamp or space heater pointing right at the area you're cleaning.
Also - I applied a tile sealer designed for porous tiles before and after re-grouting. I'm hoping that this will prevent any more gunk from making it's way behind the glazing. I'll let you know in about six months how that works out.
And one more thing - a couple of people asked me whether I'd tried chlorine bleach. No.
Here's why - chlorine bleach, if not completely neutralized will eat the tiles away from the inside out. It would not have been practical to expect to get every trace of the bleach out from behind the glazing so I didn't want to risk it. I think I would have rather let my husband go at the walls with an 8 pound sledge before trying bleach. If you've ever seen an old piece of pottery leaching out little white "flakes" that come off easily but seem to grow back - that piece of pottery was soaked in bleach at some point.
Quick recap: Bleach bad. Peroxide good, but not for your skin or nose.
I'm off now to eat some Cestone's pizza! Yay!
Thursday, December 27, 2007
2008 Resolutions - Mess with Texas!
Aaron started a discussion topic over on House Blogs asking "What are your plans for 2008?"
My own list is pretty extensive and now that I've actually written it out maybe it'll serve as a handy reminder. Or maybe it will haunt me, mocking my inadequacies... We'll know in a few months!
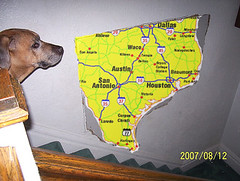
One thing on my list - which I'm about to copy and paste from the discussion forum - is to "mess with Texas"! No not the state - the hole in the wall. A hole that seemed to me to be the size of Texas that was made to install the new plumbing for the bathroom sink without disturbing the tile walls in the bathroom.
I actually at one point thought I'd done a pretty good job patching it and matching the texture of the plaster surrounding it. Alas... that was before we had electricity on the second floor. My initial elation after climbing down the ladder, flipping the switch and having LIGHT in the second floor hallway was quickly doused when I turned and there it was... Texas! It's outline as clear as when it was still a gaping hole in the wall.
It's presence dogs me. Speaking of dogs - that's our Ridgeback, Rufus, who helpfully inserted his head into the frame so that we can judge the scale of my shame.
Texas, you gotta go in '08...
and reprinted, for posterity's sake - the list:
Happy New Year, Everyone!
My own list is pretty extensive and now that I've actually written it out maybe it'll serve as a handy reminder. Or maybe it will haunt me, mocking my inadequacies... We'll know in a few months!
One thing on my list - which I'm about to copy and paste from the discussion forum - is to "mess with Texas"! No not the state - the hole in the wall. A hole that seemed to me to be the size of Texas that was made to install the new plumbing for the bathroom sink without disturbing the tile walls in the bathroom.
I actually at one point thought I'd done a pretty good job patching it and matching the texture of the plaster surrounding it. Alas... that was before we had electricity on the second floor. My initial elation after climbing down the ladder, flipping the switch and having LIGHT in the second floor hallway was quickly doused when I turned and there it was... Texas! It's outline as clear as when it was still a gaping hole in the wall.
It's presence dogs me. Speaking of dogs - that's our Ridgeback, Rufus, who helpfully inserted his head into the frame so that we can judge the scale of my shame.
Texas, you gotta go in '08...
and reprinted, for posterity's sake - the list:
Here goes - in no particular order:
Replace the crappy replacement windows on the 2nd floor with better replacement windows.
Make interior storm windows and exterior screens for the original windows on the first floor.
Replace the back door and storm door.
Replace the front storm door.
Save up and have the 50 year old furnace replaced by next winter.
Add more insulation to the attic.
(are you noticing a theme here? As I type while wearing a heavy robe OVER my clothes, slippers OVER socks, and for good measure a chenille throw around my shoulders and across my lap?!?)
Okay - back to the list:
Mess with Texas... Redo the crappy patch job that I did on the Texas shaped (and sized!) hole in the plaster on the stairway.
Strip the paint from under the eaves around the porch and repaint.
Strip and paint the porch floor boards.
Remove and replace the rotted wood around the porch skirt.
Replace porch light fixture - the bare bulb just leaves something to be desired, I think...
Build a low deck in the backyard for the pergola.
Plant a cutting garden
Fight the weeds in the creeping juniper
Reseed the lawn, pray the bare patches from the excavation turn green
Add a load of gravel to the parking area
Build a raised bed vegetable garden at the front of the parking area
Get a barrel to collect rainwater from the pipe that shoots it out into the parking area and bury soaker hoses in the vegetable garden.
Move the badly placed hose bib to the other side of the back porch.
Finish replacing the trim.
Paint the upstairs hallway.
Strip the doors.
Remove and maybe replace the carpeting on the stairs.
Refinish the living room and dining room floors.
Replace the amber 70's plastic panels in the built-in bookcase doors.
Make a decision regarding whether to cover the hideous fireplace in the dining room that may or may not be covering up the original fireplace or get up the courage to take a hammer and chisel to it and see what really lurks beneath.
Paint the bathroom in the basement
Find someone who wants the 40" 1940s Tappan range taking up space in the basement.
Replace the cracked cement laundry tub, and it's plumbing, in the basement.
I suppose that's a start... sheesh I'm tired already. Guess I'll go regrout the tile...
Happy New Year, Everyone!
Monday, December 24, 2007
Cleaning up today
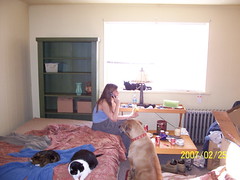
I'm excited to finally be able to see the bed in the guest room! Aside from the bathroom tile project, which is really a perfect winter project considering that it turns the bathroom into a sauna - I've found that my pace has really slowed down as the temperature has dropped.
Last summer we were bounding out of bed by 6am to get started on the day and then working on the house 12 to 14 hours on our days off. Now I'm lucky to drag myself out of bed by 8:30 and spend more time "thinking" than actually "doing".
Today I'm compromising with myself and I'm just going to organize and put things back where they go. Ladders to the basement. Tools to the toolbox. Boxes to the attic.
Then the plan is to vacuum up about 2 or 3 pounds of pet hair and enjoy a "work free" Christmas Day.
And we're wishing you the same - a day to enjoy the fruits of your labor and your loved ones. Merry Christmas from a half-cleaned American Foursquare!
Wednesday, December 19, 2007
Update on the Subway Tile Cleaning
Well, this is what the tiles look like after one application. Not perfect, but a WHOLE lot better. I think after another "treatment" or two we'll be ready for regrouting and sealing and there will be no more talk of gutting the bathroom in the foreseeable future.
 And a "before"...
 A "before" close-up...
 An "after" close up...

Lessons I'm learning as we go:
If you can possibly remove the fixtures do so - I couldn't figure out how to get mine off. I thought if I unscrewed the screw in the center of the handles they'd just pull straight off. No such luck. I definitely want to figure that out before the next application of peroxide because I think they're acting like heat sinks and hogging up all the heat that's supposed to be baking the tiles. The results are not as good in that area as elsewhere.
That the peroxide seems to work quicker and more effectively if the tiles are wet first. As I've moved along in small sections I've found that the heat is really drying out the surrounding tiles and when I coat them with the peroxide and plastic without running water over them first it takes two to three times longer to pull the grime out.
And that Goof-Off is really good for removing baked on duct tape adhesive.
Oh, and that gloves are REALLY important! God bless hairdressers - this stuff makes paint stripper seem as benign as lemonade.
 And a "before"...
 A "before" close-up...
 An "after" close up...
Lessons I'm learning as we go:
If you can possibly remove the fixtures do so - I couldn't figure out how to get mine off. I thought if I unscrewed the screw in the center of the handles they'd just pull straight off. No such luck. I definitely want to figure that out before the next application of peroxide because I think they're acting like heat sinks and hogging up all the heat that's supposed to be baking the tiles. The results are not as good in that area as elsewhere.
That the peroxide seems to work quicker and more effectively if the tiles are wet first. As I've moved along in small sections I've found that the heat is really drying out the surrounding tiles and when I coat them with the peroxide and plastic without running water over them first it takes two to three times longer to pull the grime out.
And that Goof-Off is really good for removing baked on duct tape adhesive.
Oh, and that gloves are REALLY important! God bless hairdressers - this stuff makes paint stripper seem as benign as lemonade.
Monday, December 17, 2007
Is that a ladder in your bathtub or are you just happy to see me?
 My husband complained about the bathroom yesterday - actually suggested that we may need to gut it. My husband doesn't complain much so when he does it gets my attention. Gut the bathroom? Oh, perish the thought!
What drove him to conclude that we need to gut the bathroom is his disgust with the condition of the tiles. The wonderful original subway tiles that our home inspector warned us we'd better like because they're sunk into solid concrete. I say wonderful because they're original and they're subway tiles. Who doesn't like subway tiles???
Unfortunately they are badly crazed and in the tub area the crazing is badly soiled. They look moldy - but, they're not. Dirt, body oils, etc has become embedded BEHIND the glazing. I understand my husbands feeling of defeat - I really do. I've seen the look of doubt pass across our house guests faces when I try to convince them that the shower is not dirty - it just looks dirty.
 In the six months we've been here I've tried to address the problem. I've googled "subway tile restoration", "crazed tile" into the wee hours looking for suggestions. I've tried every bathroom cleaner known to man - and some unconventional products as well. Below is a photo of just some of the "losers" in the battle of the stained crazing. I've even given some thought to professional steam cleaning or perhaps resurfacing as a last ditch effort.
Well, no more! No fakey paint type "semi-permanent" solution for these tiles. Today I tried my last idea. I thought I'd better quit stalling before I come home to find hubby sledgehammering out the walls. You wouldn't believe how EASY this is going!
 And the winner - in the war on bathroom tile sludge is..... drum roll please..... 30% Hydrogen Peroxide Solution!
 I knew that soaking old pottery in salon quality peroxide would clean the grime out of crazing - but the challenge here was that a) it was a vertical surface and b) keeping it moist. You can put a piece of pottery into a tupperware container full of peroxide and forget about it till it's done it's job - which can sometimes take weeks. Not so practical when the item you want to "soak" is the wall of the shower you need to use every day. And - did I mention? It's vertical!
Turns out the secret is applying some heat. It really speeds up the process. I'm using a disposable paint pad to apply the creme peroxide to a small section of tile at a time (about 2 squares of paper towels) - laying paper towel over the peroxide as if I were wallpapering with it - then using the pad to kind of "pounce" some more peroxide on top of the paper towel. The jabbing/pouncing motion seems to keep the paper towel from lifting, shifting, and tearing. I'm then applying a sheet of 3 mil plastic over the paper towel/peroxide mess and taping it into place with what else? Duct tape!
Then I'm positioning a space heater right in front of it to really heat it up. Most of the sections I've done today have come remarkably cleaner in about an hour. Some places are going to need a second or third application but overall I'm quite pleased with how it's going. And greatly relieved!
Now I guess I should do some research on finding a product to seal the tiles once I get them all cleaned up. Woo Hoo - it's been a very good day!
Sunday, December 16, 2007
Building a Radiator Cover Bench
 Last night I made a remark about "contributing" to the house blogger community. Then I started wondering just what it was that I might contribute - since most of my time cruising the other houseblogs is in search of answers. Then I remembered the radiator cover bench that I built a couple of months ago. I'm no carpenter, and we only have very basic tools, but I'm pretty satisfied with how this project turned out so I thought I'd share how I did it.
 I've made a sketch showing a kind of "exploded view" below. But, this is how I did it - it turned out sturdy - and you can make one too if you'd like for a lot less than it would cost to have one built. (Believe me - I priced them - YOWSA!)
First measure the length of your radiator and any pipes sticking out next to them. Add a couple of inches for adequate clearance. Write all this down, and maybe sketch it too or you may find yourself staring blankly, as I did, at a pile of lumber later.
Measure the height and again add an inch or two for clearance. Our radiator was pretty long and I wanted the bench to be even longer and even with the window sill. Ours is a little over 6 feet - with a long span you should definitely use 2" thick board for the top.
After figuring out how long and how tall I wanted it to be I cut four 2x4's to lengths 4 and 1/2" SHORTER than the desired height. Then I cut four lengths of 2x4's to my desired depth. I then screwed them together to make two identical sort of "frame" shapes - with the "depth" boards on the top and the bottom.
For the ventilation holes on the top I cut a bunch of little 2" squares from the 1/4" by 2" slats I used for the front and side covers. Then I measured out equal distances on a 1"x2" board and made a sort of "triple decker sandwich" - One 1x2, little squares along my marks - another 1x2 - another layer of the little squares - one more 1x2 - then drove 3 and 1/2" screws through all the layers at each little "chunky" part where the squares from the 1/4 x 2 x 2" squares were. I've been told I could have done this with a router. I don't have one. What's more I don't know how to use one. But, if you do I guess that's something to consider.
 Next I put both 2x6 boards andthe vent section I'd just made on top of the "frames" and "mooshed" them around on top until I was satisfied with the positioning and then fastened them to the frames with screws from the underside.
I used 1x6 boards to make rectangular frames for the front and sides, then screwed the 1/4" x 2" slats to the backside of the frames. Next I screwed them into place from the backside of the 2x4 end frames. It might be easier to use metal corner brackets to attach the side panels. I think I just "toenailed" them at an angle.
Also - I didn't show it in the "exploded view" - but after the front and side panel were in place I went in from the open back side and attached another 2x4 lengthwise to the 2x4 end frames just for additional stability. It probably wouldn't have hurt to do one across the bottom too - but I was out of 2x4s and it really is pretty sturdy as is. Someday I'll probably get around to adding it. My husband is a little over 200 pounds and he and I can both sit on it at the same time without feeling nervous. If you're just making a cover, and not a bench the extra reinforcement would probably be overkill.
Oh, and I almost forgot - when it was finished I put two of those little self adhesive plastic slider things under the 2x4 frame on each end so it's a breeze to slide out if we need quick access to the radiator.
Saturday, December 15, 2007
Knowing your limitations

Clint Eastwood once said, in a movie, "a man's gotta know his limitations". Or something like that... Well, so do homeowners and I find I have to remind myself of that sometimes. Maybe I watch too much HGTV, or read too many design magazines, or drool over too many other housebloggers photos. All I know is sometimes I catch myself getting caught up in a "fixer upper" daydream that's just not practical to the situation we're in.
Take our trim for example: Oh, wait! You can't take our trim! Someone else beat you to it before we even moved in. Yes, that's right. Someone removed the very beautiful oak trim as well as the two sets of pocket doors in our living and dining rooms and some random pieces from the bedrooms too.
They "patched" the tell-tale holes where the pocket doors would have gone, but the bottoms of the walls were just left bare. Don't get me wrong here - I love this house - and want desperately to "make it right". But, oak replacement trim, (let alone pocket doors!) just aren't in the budget. Perhaps if this house were in a different neighborhood, in a different market, I could justify the expense. But, I have to face reality. It's an adorable house, in rough condition, in a decent working class Pittsburgh neighborhood. Should we have to sell it one day - even ten to fifteen years down the road we'll probably be lucky to break even.
Paint grade pine it is... At least it's not MDF. Right?
Monday, December 10, 2007
What's a Foursquare?


You'll find lots of information online about fourquares, but the one thing I really had trouble finding were typical floorplans and layouts. So, I mocked up these rudimentary sketches in photoshop to show basically what our floorplan looks like. I believe these are pretty typical layouts for modest foursquares. No pantry, no mudroom, no powder rooms like you might find in the larger or more affluent homes of the time.
Shoulda Coulda Woulda
I suppose if I were going to blog about this experience it would have made sense to start from the beginning. Instead we're about six months down the road of this remodeling/repairing adventure and although far from over we have managed to overcome some of the biggest hurdles to making this a proper home.
Not the least of which was purchasing it in the first place. It was a bank foreclosed REO, transferred to HUD, who was more than a little difficult to deal with. Aside from obvious charm and sturdy bones this home failed every other possible aspect of it's home inspection.
A failed roof, an active termite infestation, lead paint, bad plumbing, faulty wiring, an ancient furnace, pilfered trim, missing light fixtures, missing doors, damaged walls, stinky carpeting, cracked windows and mold is only a partial list of what we faced when we signed onto this project. But, we loved it then and we love it now.
So, welcome to the blog that I hope will document our trials and accomplishments as we continue to pour heart and soul - oh, and money - bags and bags of money! - into our darling little money pit.
Subscribe to:
Posts (Atom)
